Friday, 13 September 2024

DB2 Troubleshooting

 Failure Creating a Database in DB2

Error: SQL1092N The requested command or operation failed because the user ID does not have the authority to perform the requested command or operation. User ID: ""
Resolution: 
  • Add the domain user ID to the local group DB2ADMNS.
  • Open the DB2 command window - Administrator and run the following commands from the prompt:
            db2 update dbm cfg using sysadm_group DB2ADMNS
            db2stop                                        
            db2start
  •  Use the runas command to run as db2admin user so as to be able to create database
  • Run the following command to set the DB2 command line (DB2CLP) variable
            db2cmd -i -w db2clpsetcp

            db2set DB2_GRP_LOOKUP=LOCAL      

            runas /noprofile /user:db2admin cmd

            Enter the password for db2admin: <Enter the password>


Wednesday, 11 September 2024

MQSI Commands

Create a note
  mqsicreatebroker INODE -i [user] -a [passord] -q QMGR 

 Delete a node
  mqsideletebroker INODE

Tuesday, 27 August 2024

HTML

 Add Patreon link

<a  href="[add url of your Patreon page]">

<button class="patreon-button">Become a patron!</button></a>


Thursday, 15 August 2024

Xpath Code Snippets

 Convert UTC date time to local date time

fn:adjust-dateTime-to-timezone(xs:dateTime($value), xs:dayTimeDuration('PT2H'))

PT2H means UTC+2

 Remove leading zeroes

fn:replace(0000005789,'^0+','')

Monday, 29 July 2019

Display Thumbnails for Popular Posts in Blogger

I wanted to show thumbnails in my Popular Posts and I achieved this by using CSS.

Prerequisites:
The Popular Posts widget must be added to the Sidebar in your Blogger template.
Posts have a featured image. In Blogger, this is generally the first image in the post's HTML content. My featured image is 550px by 550px.
Post title and image thumbnail must be checked on the widget configuration options.

Configure Popular Posts


Modify the code below and replace #sidebar-right-1 with the name of your right sidebar section and replace #PopularPosts1 with the name of your popular posts widget/gadget.

Search for  </head> and paste the CSS below just above  </head>
The CSS
 <style type='text/css'>  
   #sidebar-right-1 #PopularPosts1 ul{padding:0;margin:0;}  
   #sidebar-right-1 #PopularPosts1 .item-thumbnail a{clip:auto;display:block;height:auto;overflow:hidden;}  
   #sidebar-right-1 #PopularPosts1 .item-thumbnail{width:130px;height:130px;border-right:5px solid #fff;margin:0px 10px 0px 0px !important;position:relative;}  
   #sidebar-right-1 #PopularPosts1 .item-thumbnail img{position:relative;height:auto;width:100%;padding:0;}  
   #sidebar-right-1 #PopularPosts1 ul li{float:left;margin-bottom:5px;max-height:130px;min-width:250px;overflow:hidden;}  
  #sidebar-right-1 #PopularPosts1 ul li:first-child{background:#E7717D;}  
   #sidebar-right-1 #PopularPosts1 ul li:first-child + li{background:#C2CAD0;}  
   #sidebar-right-1 #PopularPosts1 ul li:first-child + li + li{background:#E7717D;}  
   #sidebar-right-1 #PopularPosts1 ul li:first-child + li + li + li{background:#C2CAD0;}  
   #sidebar-right-1 #PopularPosts1 ul li:first-child + li + li + li + li{background:#E7717D;}  
   #sidebar-right-1 #PopularPosts1 ul li:first-child + li + li + li + li + li{background:#C2CAD0;}  
   #sidebar-right-1 #PopularPosts1 .item-title{font:13px &#39;Arial&#39;, sans-serif;text-transform:capitalize;padding:5px 2px 5px;}  
   #sidebar-right-1 #PopularPosts1 .item-title a{color:#000;text-decoration:none;}  
   #sidebar-right-1 #PopularPosts1 .item-snippet{font:13px &quot;Times New Roman&quot;,Times,FreeSerif,serif;padding-right:5px;}  
   #sidebar-right-1 .#PopularPosts1 .widget-content ul li{padding:0px 5px 0px 0px!important;}  
 </style>  

The :first-child CSS pseudo-class represents the first element among a group of sibling elements. In this case, it targets the first popular post in my list, li:firstchild.
To prevent my popular posts thumbnail from being pixelated I changed the following statement
 <b:with value='data:post.featuredImage.isResizable ? resizeImage(data:post.featuredImage, 72, &quot;1:1&quot;): data:post.thumbnail' var='image'>  
to
 <b:with value='data:post.featuredImage.isResizable ? resizeImage(data:post.featuredImage, 550, &quot;550:550&quot;): data:post.thumbnail' var='image'>  
The images in my post are 550px x 550px.

Thursday, 18 July 2019

How To Use Java Architecture for XML Binding (JAXB) in IIB

JAXB enables IIB via the Java Compute Node to work with a model of message data as Java object classes. This Java object model can be accessed and manipulated by using getter and setter methods.

In IIB Toolkit import the XML schema into your application.

Create a message flow with a JavaCompute node, select the Process via Java Architecture for XML Binding (JAXB) class template.

Click Finish.

Select a Message Model Schema file or container with schema from which JAXB Java Object Classes will be generated. Select option to Generate JAXB Java Object Classes from Message Model Schema for us in the Java Compute Node Class.


Type the Java Target Source Folder and the Target Java Package and click Finish.
Accept the default values on the next screen and click Finish.

The JAXB Java object classes are visible in the Application Development view, under the JaxbAppJava(in my case) source folder of the Java project that you selected in the wizard.


The next thing to do is to process the message body data by using JAXB Java object classes, the JAXB Java object classes are a Java object representation of your message.


The code below shows some JAXB code that reads a record from the payload using a getter method.

Monday, 24 June 2019

Publish/Subscribe

Publish/subscribe is a style of messaging application in which the providers of information (publishers) have no direct link to specific consumers of that information (subscribers), but the interactions between publishers and subscribers are controlled by pub/sub brokers.

In a publish/subscribe system, a publisher does not need to know who uses the information (publication) that it provides, and a subscriber does not need to know who provides the information that it receives as the result of a subscription. Publications are sent from publishers to the pub/sub broker, subscriptions are sent from subscribers to the pub/sub broker, and the pub/sub broker forwards the publications to the subscribers.

Publish/Subscribe is a term used to define an application model in which the provider of some information is decoupled from the consumers of that information.

A typical publish/subscribe system has more than one publisher and more than one subscriber. An application can be both a publisher and a subscriber.

New providers/consumers can be added without disruption

The publisher generates a message that it wants to publish and defines the topic of the message. A subscriber registers a request for a publication by specifying the topic (or topics) of the published messages that it is interested in. Subscriptions to an MQ pub/sub broker might include the following information:
The subscription point from which it wants to receive publications.
The content filter that should be applied to the published message.
The name of the queue (known as the subscriber queue) on which publications that match the criteria selected are placed. This queue can be a cluster queue, so that publications can be distributed to clustered subscribers.

Publishers provide information about specific topics by sending publications to the queue manager. MQI publishers use the MQPUT verb
Subscribers register subscriptions with the queue manager to indicate their interest in information relating to specific topics. MQI subscribers use the MQSUB verb

The queue manager forwards each publication it receives to all subscribers with a subscription which matches the associated topic


In the compute node set the message type to publish and topic name, before you pass it to the Publication node.

SET OutputRoot.MQRFH2.psc.Topic = '/data/v1';
SET OutputRoot.MQRFH2.psc.Command = 'Publish';

In WebSphere MQ Explorer create the topic '/data/v1'


In WebSphere MQ Explorer create a subcription, subscriber1


I will then create a subscriber flow which will read messages from the test queue.

Tuesday, 18 June 2019

Configuring Email Nodes to Receive and Send Emails using Office365 Mailbox in IBM Integration Bus


Enter the following commands to enable IBM Integration Server to use secure POP.

mqsichangeproperties <Integration Node> -e <Integration Server> -o HTTPSConnector -n sslProtocol -v TLSv1.2

mqsichangeproperties <Integration Node> -e <Integration Server> -o ComIbmJVMManager -n jvmSystemProperty -v "-Dmail.smtp.starttls.enable=true -Dmail.smtp.auth.enable=true"

mqsichangeproperties <Integration Node> -e <Integration Server> -o ComIbmJVMManager -n truststoreFile -v <path to trust store file>

mqsichangeproperties <Integration Node> -e <Integration Server> -o ComIbmJVMManager -n truststoreType -v JKS

mqsichangeproperties <Integration Node> -e <Integration Server> -o ComIbmJVMManager -n truststorePass -v brokerTruststore::password

mqsisetdbparms <Integration Node> -n Intermittent::truststorePass -u ignore -p <trust store password>

mqsichangeproperties  <Integration Node> -e <Integration Server>  -o ComIbmJVMManager -n keystoreFile -v <path to key store file>

mqsichangeproperties  <Integration Node> -e <Integration Server>  -o ComIbmJVMManager -n keystoreType -v JKS

mqsichangeproperties <Integration Node> -e <Integration Server> -o ComIbmJVMManager -n keystorePass -v Intermittent::keystorePass

mqsisetdbparms <Integration Node> -n <Integration Server>::keystorePass -u ignore -p <key store password>

mqsisetdbparms <Integration Node> -n email::securityIdentityName –u myEmailServerUserID  -p 'myEmailServerPassword'

Stop and restart the integration server.

Tuesday, 26 March 2019

Good IIB ESQL Coding Practices

Array Index Notation
Avoid traversing the elements in sequence, starting from 1, until n is reached for every iteration of the loop. Instead, use a reference variable and the MOVE NEXTSIBLING syntax.

For a loop of 100 elements, index access notation results in 5000 (50 x 100) element traversals instead of 100 with the MOVE statement (50 times more). For a larger list of 1000 elements, it is worse; 500000 (500 x 1000) traversals instead of 1000 (500 times more).

Example of using reference variables

 DECLARE empRef REFERENCE TO OutputRoot.JSON.Data.Employee.Item[1];  
 WHILE LASTMOVE(empRef) DO  
  empRef.Name = 'John Smith';  
  MOVE empRef NEXTSIBLING;  
 END WHILE;  


Cardinality Function
The following guidelines apply to using this function:

  • Don't use it to set an iterative limit on a loop that then uses array index notation.
  • Don't use it to count the number of elements in a large, unparsed file since this will likely cause an abend.
  • Don't use it to test for the existence of an element


Tree Access Order and Path References
Message trees are a complex data structure that behave much like a doubly linked list.
Ways to optimize performance include:

  • locating often referenced items near the top of a child list
  • defining reference variables for complex element paths in order to avoid repeated evaluations
  • avoid generic recursive tree walks.


Use XMLNSC for XML Processing
XMLNSC is the most efficient XML parser in IBM® Integration Bus. Use it in preference to MRM and other XML parsers

Minimize Message Flow Node
Try to avoid chains of compute nodes in a simple msgflow that could be easily combined into one node.

Source: IBM © Integration Bus Information Centre

Tuesday, 12 February 2019

Accessing a User Defined Configurable Service in Java

A UserDefined configurable service is accessible by the JavaCompute Node node only, and cannot be accessed by ESQL.

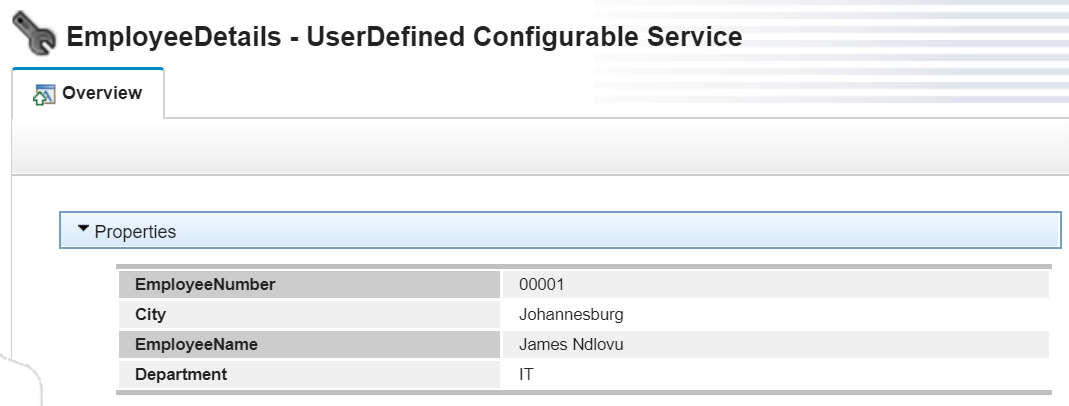
I created a UserDefined configurable service with the following values:

EmployeeDetails
EmployeeNumber:  O0001
EmployeeName:  James Ndlovu
Department:  IT
City: Johannesburg


In the LocalEnvironment set the EmployeeNUmber in Variables/EmployeeNumber which I want to use to retrive the Employee Details from the config service.

To create the Java code, right-click the JavaCompute node and click Open Java to create and open a Java™ file in the Editor view.
Create the Java class for the node in which you want to include IBM Integration API methods.
Add the IBM Integration API JAR file install_dir/common/classes/IntegrationAPI.jar to the Java build path for the associated Java project.

Import com.ibm.broker.config.proxy.* in your code.


try { // create new message as a copy of the input MbMessage outMessage = new           MbMessage(inMessage); outAssembly = new MbMessageAssembly(inAssembly, outMessage); /*get   employee details from local environment variable */
 MbMessage localEnv = inAssembly.getLocalEnvironment(); 
 MbElement empNoVar =     localEnv.getRootElement().getFirstElementByPath("Variables/EmployeeNumber"); 
 String employeeNumber = empNoVar.getValueAsString(); 
 BrokerProxy b = BrokerProxy.getLocalInstance(); /*return an instance of the BrokerProxy object for the integration node to which the message flow (that contains this node) is deployed */
 while (!b.hasBeenPopulatedByBroker()) 
 { 
   Thread.sleep(100); /*This ensures that the BrokerProxy object is populated with data from the integration node before you access the configurable service */
 } 
 ConfigurableService vendorUDCS = b.getConfigurableService("UserDefined", "EmployeeDetails"); 
 String employeeDetails = vendorUDCS.getProperties().getProperty(employeeNumber); /*output the employeeDetails to a local environment variable*/
 MbMessage newEnv = new MbMessage(localEnv); newEnv.getRootElement().createElementAsFirstChild(MbElement.TYPE_NAME_VALUE, "EmpDetails", employeeDetails); 
 outAssembly = new MbMessageAssembly(inAssembly, newEnv, inAssembly.getExceptionList(), inAssembly.getMessage()); 
b.disconnect();

catch (MbException e) 
{ // Re-throw to allow Broker handling of MbException throw e; }

Friday, 25 January 2019

Creating WebSphere MQ Objects

Below are some commands for creating mq objects.
Use the DEFINE QLOCAL to create a local queue
DEFINE QLOCAL ('myqueue') +
       DESCR('my test queue') +
       PUT(ENABLED) +
       DEFPRTY(0) +
       DEFPSIST(YES) +
       DEFPRESP(SYNC) +
       SCOPE(QMGR) +
       GET(ENABLED) +
       PROPCTL(COMPAT) +
       DEFREADA(NO) +
       MAXDEPTH(999999999) +
       CLUSTER(' ') +
       CLUSNL(' ') +
       DEFBIND(OPEN) +
       CLWLRANK(0) +
       CLWLPRTY(0) +
       CUSTOM('capexpry(25920000)') +
       REPLACE

Use the DEFINE QALIAS to create an alias queue
DEFINE QALIAS ('myaliasq') +
DESCR('My alias queue') +
PUT(ENABLED) +
  DEFPSIST(YES) +
SCOPE(QMGR) +
        GET(ENABLED) +
TARGET ('REMOTE QUEUE')

Use the DEFINE QREMOTE to create a remote queue
DEFINE QREMOTE (REMOTE QUEUE) +
DESCR ('Remote Queue') +
RNAME (REMOTE QUEUE) +
RQMNAME (QMGR1) +
XMITQ (XMIT1)

You can save the commands in a text file.
Use the runmqsc command to issue MQSC commands to a queue manager.

runmqsc QMGR  <  C:\Temp\MQ_Objects.txt > C:\Temp\result.txt

The above command will invoke the MQSC commands in the text file against the QMGR queue manager. The result is sent to result.txt.

From WebSphere MQ veriosn 8.0.0.4, a new attribute CAPEXPRY has been introduced that can be used to alleviate problems of messages building up and hitting maximum depth limits. Setting this attribute on a destination means that when a message is put to that destination, the expiry time of the message will be limited to the value set in CAPEXPRY.

Sunday, 25 November 2018

How To Show Post Title Before Blog Title in Blogger

Click on Theme.
Edit HTML.
Search for
<title><data:blog.pageTitle/></title>

Replace with:-

<b:if cond='data:blog.pageType == "item"'>
  <title><data:blog.pageName/> |<data:blog.title/></title>
<b:else/>
  <title><data:blog.pageTitle/></title>
</b:if>
<data:blog.pageName/> |<data:blog.title/> <data:blog.pageTitle/>

Sunday, 18 November 2018

Helpful Links

Self Study Labs

 These can be found here.

DFDL Tutorials
There is an introduction to DFDL here.
There are some very helpful DFDL tutorials here.

Sunday, 11 November 2018

Properties versus MQMD folder behavior

I had a REST API message flow where I needed to backup the JSON payload to WebSphere MQ queue. I needed to set the expiry interval on the message.

My message was sourced from an HTTPInput node. This meant that I could not directly set the expiry by simply using the following ESQL statement:-

SET OutputRoot.MQMD.Expiry = '7899100';

The above statement would not have worked since my message was sourced by an HTTPInput message, no MQMQ tree existed.

When a message flow is sourced by an MQInput node there is an MQMD to parse which makes it easy to set the Expiry value.

  1. When your message flow is sourced by an MQInput node, the MQMD takes precedence over the Properties folder in terms of value propagation between the folders.
  2. When your message flow is sourced from an input node that is not the MQInput node (such as the HTTPInput node or a user-defined input node), the MQMD header does not take precedence over Properties folder .
  3. When an MQMD folder is added in a tree that was created by the HTTP Transport, this MQMD does not have control over the Properties folder and the value propagation direction is not MQMD to Properties; it is Properties to MQMD - source IBM Integration Bus Information Center.
To set the message expiry I set both the Properties.ExpirationTime and MQMD.Expiry.

SET OutputRoot.Properties.ExpirationTime = 6048000;
SET OutputRoot.MQMD.Expiry= 6048000;


Thursday, 1 November 2018

Editing configurable properties in a BAR file with MQSIAPPLYBAROVERRIDE

A bar file's configurable properties can be customized without editing and rebuilding the message flows or the resources that they use.

This can be achieved in the following ways:

  1. Editing configurable properties with the IBM Integration Toolkit.
  2. Editing configurable properties with the mqsiapplybaroverride command

In this post I will concentrate on editing the configurable properties using the mqsiapplybaroverride command.

1. Use the mqsireadbar command to determine which propertes can be configured.

mqsireadbar -b <barfile> -r

e.g. mqsireadbar -b c:\myBarFile.bar -r

The above command will display the properties on the screen.

2. Use the mqsiapplybaroverride to change the properties

Command Syntax
 mqsiapplybaroverride -b barFileName [-p overridesFile] [-m manualOverrides] [-k applicationName] [-y libraryName] [-r] [-o outputFile] [-v traceFileName] 

Command options: 
 '-b barFileName' - The name of the BAR file (in zip format) to be overridden.
 '-p overridesFile' - The file name of the plain text file that contains one of these items: the integration node properties to be overwritten, the entire new deployment descriptor, or a BAR file that contains the entire new deployment descriptor.
 '-m manualOverrides' -  A comma separated list of key=value pairs that describe the overrides to apply. On Windows systems, the list must be enclosed in quotation marks (""). If used in conjunction with -p, the overrides that are specified with the -m parameter are performed after all overrides that are specified by the -p parameter have been made.
 '-k applicationName' - The name of the application to which the overrides will be applied.
 '-y libraryName' - The name of the static library or shared library to which the overrides will be applied.
 '-r' - requests that overrides are applied recursively through applications and libraries.
 '-o outputFile' - The name of the output bar file to which the bar file changes are to be made. If this name is not specified, the input file is overwritten.
 '-v traceFileName' - Verbose internal trace is sent to the specified file.
 Note: Overrides must be supplied either in the form FLOW#NODE.PROPERTY=NEWVALUE or in the form OLDVALUE=NEWVALUE. If the latter form is used, OLDVALUE must already be an overridden value in the deployment descriptor. Specify FLOW#NODE.PROPERTY on its own to remove an override.

Create a text file, and list the properties that you want to change in the following format:
property=newValue.

mqsiapplybaroverride -b <barfile> -p <overridesFile> -k <application name>

Spefify output file parameter if you dont want the bar file to be overwritten.

mqsiapplybaroverride -b c:\temp\test.bar -p c:\temp\BarFileOverride.txt -k c:\temp\test.bar

Alternatively instead of using the command console, the bar file can be overridden by using the overrides file in the web console by clicking the Overrides button and selecting the overrides file.

N.B - the user running this command should be an administrator of the machine.

Tuesday, 16 October 2018

Environment and Local Environment in IIB

Environment


The environment tree is a part of the logical message tree in which you can store information while the message passes through the message flow. The Environment folder is created at the start of a thread. It stays with the thread until the thread dies.
All data that is stored in the Environment tree is stored in memory during the whole message flow and is not freed after it is out of scope. Therefore, if you need space to store local data for node work, then use the LocalEnvironment tree and avoid high memory consumption.

The environment tree differs from the local environment tree in that a single instance of it is maintained throughout the message flow. If you include a Compute node, a Mapping node, or a JavaCompute node in your message flow, you do not have to specify whether you want the environment tree to be included in the output message. The environment tree is included automatically, and the entire contents of the input environment tree are retained in the output environment tree, subject to any modifications that you make in the node. Any changes that you make are available to subsequent nodes in the message flow, and to previous nodes, if the message flows back (for example, to a FlowOrder or TryCatch node).

LocalEnvironment


The local environment tree is a part of the logical message tree in which you can store information while the message flow processes the message.
The local environment tree is made up of the following structure:
Anything in the format of LocalEnvironment.Destination.output_or_request_node_name, for example; LocalEnvironment.Destination.Email, decides what happens when information is going into an output or request node.
Anything in the format of LocalEnvironment.WrittenDestination.output_or_request_node_name, for example; LocalEnvironment.WrittenDestination.FTE, gives you information about the processed output of an output or a request node.
Anything in the format of LocalEnvironment.input_node_name.input, for example; LocalEnvironment.Adapter.Input, contains information that has been stored by an input node.
Use the local environment tree to store variables that can be referred to and updated by message processing nodes that occur later in the message flow. You can also use the local environment tree to define destinations to which a message is sent.

Conclusion


Use the Environment for scratchpad work where you need to maintain the content beyond the scope of the current node, and use the LocalEnvironment for larger scratchpad areas that are only required during the current node, and you need to release the memory after use.
If you want to keep your own values, create it in the environment tree in a subtree called Variables.

Source: IBM® Integration Bus Version Information Center

You may also be interested in these posts: Environment Tree || Populating Destination in the local environment tree

Thursday, 20 September 2018

Access and Update Local Environment in Java

Access Local Environment in Java 


MbMessage localEnv = inAssembly.getLocalEnvironment();
MbElement nameVar = localEnv.getRootElement().getFirstElementByPath("Name");
String name = nameVar.getValueAsString();


Update Local Environment in Java 


MbMessage newEnv = new MbMessage(localEnv); newEnv.getRootElement().createElementAsFirstChild(MbElement.TYPE_NAME_VALUE,"Name","James"); 
outAssembly = new MbMessageAssembly(inAssembly,newEnv,inAssembly.getExceptionList(),inAssembly.getMessage()); getOutputTerminal("out").propagate(outAssembly);

Wednesday, 19 September 2018

Accessing a Configurable Service using Java

The configurable service is a readily available to keep data that an integration message flow may need at runtime.

1.Create a User Defined Configurable Service using the web console and populate it.


2. The UserDefined Configurable Cervice properties can only be accessed using a JavaCompute node.

Import com.ibm.broker.config.proxy.* in your code.
  import com.ibm.broker.config.proxy.*; 

BrokerProxy b = BrokerProxy.getLocalInstance(); 
while(!b.hasBeenPopulatedByBroker())
{
   Thread.sleep(100); 
}
ConfigurableService vendorUDCS = b.getConfigurableService("UserDefined", "MyConfigService"); 
String vendorMQDetails  = vendorUDCS.getProperties().getProperty("server");


This method below will return an instance of the BrokerProxy object for the integration node to which the message flow is deployed.
BrokerProxy b = BrokerProxy.getLocalInstance();

 To ensure that the BrokerProxy object has been populated with data from the broker
  before we access the configurable service, Add the following code:
while(!b.hasBeenPopulatedByBroker()) {
   Thread.sleep(100); 
}

The statement below will return a User Defined Configurable service called 'MyConfigService' ConfigurableService vendorUDCS = b.getConfigurableService("UserDefined", "MyConfigService");

You maybe interested in this post: Accessing a User Defined Configurable Service in Java

Thursday, 23 August 2018

Create a JSON Array in IBM Integration Bus

CREATE FIELD OutputRoot.JSON.Data.to_BusinessPartnerTax IDENTITY (JSON.Array)to_BusinessPartnerTax;
SET OutputRoot.JSON.Data.to_BusinessPartnerTax.Item[1].BusinessPartner = '';
SET OutputRoot.JSON.Data.to_BusinessPartnerTax.Item[1].BPTaxType = '';
SET OutputRoot.JSON.Data.to_BusinessPartnerTax.Item[1].BPTaxNumber = '';

Wednesday, 18 April 2018

Create a REST API in IBM Integration Bus from scratch

File ->New ->REST API

Enter a name for the REST API. The name that you specify is used as the name of the project in the IBM Integration Toolkit.